Wednesday, December 31, 2008

Johan Hangaman, and a request for etsy jewlery suggestions

I've been keeping so busy here with doing some sightseeing around Seoul and shopping for things for my new place, and still buying christmas presents for shipping back home. However, i have had some time for doing other things too.

I have finished off another ATC. The background was created about a year ago, when i was experimenting with newspaper and inks. I really liked how it turned out, but didn't have a use for it at that time. I tucked it away for later use (as i do so many other backgrounds). I then was inspired flipping through an old issue of Cloth Paper Scissors (see 2 paragraphs down) and knew it was time to use that background. I sketched the main body with pencil, and then painted it in with acrylic. I cut a square hole in the torso, and then gel medium'd on a small metal frame i'd found at a dollar store. After, i used a packing tape transfer with a picture of a nest i'd digitally altered to make into blue tones and had upped the contrast.

I love using packing tape transfers because they're interesting to look at, simple and very cost efficient. If you have never tried one, they are the simplest thing. Take a laser printed/photocopied picture and burnish on a piece of tape. Put the picture in warm water for 30 minutes and then rub the paper off the tape. The ink will stay on the tape... you now have a transparant copy of your picture to stick wherever you like! I learned this at a mini-workshop, put on by one of my fellow ATC group people back home.

I was inspired on this one by Johan Hangaman's fabulous sculptures shown in the July/August issue of Cloth Paper Scissors, especially 'Ajar'. You can find her main page here or you can skip right to her fabulous gallery (Ajar is the second one)here. I would highly recomend checking otu johan's studio. Her work is so very beautiful, and i find it speaks very strongly to me. I am fascinated by the varied medias she uses to create her sculptures, including cement, wire, beeswax, fabric, and the list goes on. The very idea of working with all those fabulous media makes me drool, but not so much as the idea of seeing one of these in person! If you're in L.A. (or the area surrounding it), she has a spot in the Los Angeles Art Show. Wish i was closer myself. It is not only the media that i find beautiful, but the stunning simplicity to her lovely, lovely sculptures speaks very strongly to me. This is worth checking out!


I also finished off a bracelet. I've worn it a couple times now, and am wishing i owned a blowtorch to 'draw a bead on the wire' like they talk about in the book (i had to leave mine at home, as i don't think they wanted those on the plane hahaha).

Lastly, i've been poking around etsy for a bit... my book loving boyfriend and i have a deal... for our christmas presents (which are late this year as a result of the move) we are to make a wish list of 5 things online, and then the other will ship one of the five things. I am feeling a little overwhelmed at the etsy site... there is SO MUCH fabulous stuff! Unless you know really the type of thing you are looking for, it is a big thing to pick something special! One helpful way is to have a favorite artist or two on there. I know i want to pick up a necklace... but which one? Do you guys have any favorite jewelry artists on etsy? I like things that have a touch of 'steampunk' to them... something with a hint of lovely rust?

Sunday, December 28, 2008

Anyone here trade atcs?

So, i have a couple atcs that are available, and was just wondering if there was anyone out there that wanted to trade? I just finished 'Ralph Waldo Emerson' yesterday!


Quilted

Water is Life


Ralph Waldo Emerson


Fly

Thursday, December 25, 2008

New blog link

I have created another blog for my talk about my life here in korea. I find that i may have two fairly different audiences for the two topics, and have decided to create a second blog for that reason. On it, i will show pictures of my life here in korea, and talk about how things are going. Here, i will continue to show my art. If any of my blogfriends here want to come visit my new blog, you are more than welcome! I may even have a giveaway or something there soon... we will see.

The link to my new blog is http://daleskoreanadventure.blogspot.com/

I'm here!

After a long flight, i have finally arrived here in Korea!! Ryan (my boyfriend) and myself are settling in nicely to our fabulous apartment. I am quite pleased with the place. Unfortunately, we do not have Internet yet! I will be posting pictures of here around Seoul, once the Internet gets hooked up on Friday. For now, i am getting my 'fix' here at the 'pc-bong' (Internet cafe).

So, i am still debating whether i should set up another blog, but i think i will be. I will set one up for everything about my life in Korea. This will be mostly for my friends and family back home, and for any of you that are interested. I will continue to put my art stuff up on this blog. Once the new blog is set up, i will put the address up here.

Friday, December 12, 2008

Leaving date!

Those of you who might have been following my blog know i have been talking about my impending trip to korea... i finally have a date for my flights!!! After 2 months of waiting, i move to Seoul, Korea next wednesday! Wish me luck with my flights :).

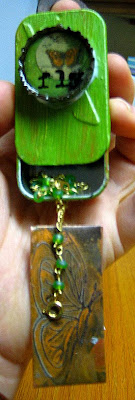
Also, i went to send a friend a link to the mint tin present i'd been creating, and discovered i never did post the final product! Silly me. This is my presnet to my friend Erin. It includes a hand made bracelet and the tin case. The hanging charm is etched and rusted copper and the framed charm is resin. I discussed the process i went through (and it WAS a process) in previous posts.


I wrapped it up all nice for Erin. I hope she likes it :).

Lastly, i had been recently linked to a book giveaway on a new blog... Ilka's Attic. She is giving away her book Exhibition 36: Mixed media demonstrations + explorations. I myself am intrigued by the idea of getting a mixed media book... i'll have to keep an eye out for it next time i'm at the bookstore.

Saturday, December 06, 2008

Window Garland


We put up the tree here at my boyfriend's parents place ( who have been ever so kind in allowing us to stay with them until i leave). We had these beautiful butterflies, but there wasn't really room for them on the tree (and they weren't 'christmasy' enough for ryan). We decided to make a really nice window garland with them and their matching ornaments. What a cheap, fun way to make the windows look nice :).

Friday, December 05, 2008

ATCs finished

I finished up an ATC before moving out that i hadn't posted yet. Thought i'd show it here. Maybe that will help fulfil some of my art fix? My fingers are just itching to work with some resin, but everything is packed up and probably will be till i hit korea. I think it would be great to create a resin bezel or something like that for the most recent Creative Construction challenge, which has 'fire' for it's theme.

This card i think will be going to Collette. She made some gorgeous atcs, and i am really looking forward to trading with her. I created the background with gesso and texturing, and scratched the word 'fly' into it. I then painted it. The first part of the nest is painted on, and then i glued on feathers. Three beads were wired up and then attached to the card.

I wish i could start a countdown to the time when i go to korea, but i don't know my leaving date yet! Sometime in the next two week, at latest. I'm so very excited!

Tuesday, December 02, 2008

Ode to my art table

Well, table, i guess this is goodbye. I'm moving out of this basement suite and you aren't comming with me.

From when I first saw you at Ikea i knew you were the table for me (and not just because you were only 10$). You started out as my table for holding my stereo, but when i moved into the basement here you became my art table.

We had some good times as a table. You were a good drying surface for my myriad of projects. I could splash paint/resin/rust/glue/whatever all over your surface ithout any great concern. When i started jewelry making, i even accidentaly drilled holes in you! You took it all with your stoic, blue ways. I loved being inspired by the splashes of all the different media i worked with.

Things weren't always great. I appologize for the times when I cursed you for your lack of height. It isn't your fault that you are only about 2 feet high, thereby forcing me to sit on the floor and get stiff knees. Nor is it your fault that you were all sticky in the top corner after i spilled some resin there that didn't cure propperly.

Hope it isn't too cold out there...

Dale

So, i am now officially moved out of the basement suite. After 5 days of intensive moving, packing, hauling, and cleaning, I am finally moved in with my boyfriend and his family. This is all only temporary, until my visa is finally processed and i am off to KOREA! Should be gone on only about 2 weeks :).

As for my art table, it was with great sadness that i tossed it in the dumpster. It was sticky and kinda destroyed... too bad. Couldn't resist a silly little 'ode to my table' here.

Hope your week is off to a great start :).

Monday, November 24, 2008

Resin tips and a fabulous link

First i'd like to put out a thanks to the lovely Carmi. She really came through for me last post, when I asked about what to do when your resin does not cure propperly.

I thought I'd throw out there what I have learned myself so far about working with resin, as I didn't really find a sastisfactory answer on the internet before Carmi came along.

1)The humidity of the air affects the curing of the resin. I had done work with resin before, but it dried outside on a hot, dry summer day. This time, it cured in my basement. I found large differences with results between the two (the dry air being the better result).

2)In order to remove the bubbles forming in the resin, use a bbq lighter and wave the flame back and forth over the surface. The heat causes the bubbles to go away.

3)The amount of hardening agent in relation to the amount of resin is very important. If there is not enough hardening agent, the resin will not cure propperly.

4)Be very careful when working with resin. It is extreemely difficult (impossible?) to clean off if your resin drips on your a) table, b) hands, c) jeans, d) mistaken parts of your project. (Unfortunately, resin dripped on all four for me. Luckily, the jeans were old and already ruined when dripped India Ink).

5)Resin makes a really neat coating on top of paper. I used the leftover resin from remaking my charm and coated two backgrounds for ATCs that i'd made... it dried really neat and shiny, as if the piece was made from plastic. Well worth trying :).

6)Sometimes, after you mix resin, it goes CLOUDY! I don't know why this happened. Any commenters out there that can answer this, i will edit the answer in here.

7)Don't glue resin charms onto the main piece until you are CERTAIN that they have cured properly.

8)If there are small scratches on the surface of your resin, you can sand it or add another coat of resin to smooth it out. ( I haven't tried this one myself yet, but this is what i read on a blog)

So, as you can see, I definately learned some positive things and some negative things about working with resin. I decided to follow Carmi's advice with the previous embelishment i had been working on, and just add another layer of resin that would hopefully cure propperly. It was clear when i mixed it, but when i looked at it again about 5 minutes later, it had gone quite cloudy! I tried washing it out, hoping it would get out the resin (where i learned lesson #4 lol). This did not work at all. I had to pull off the charm, which wrecked the paint. I therefor had to re-prime, re-paint and make a new charm for the piece. I have created a new charm now that I think I like even better, and all that remains is for me to screw it onto the main piece. I'll post this once it's finished. Good think Erin isn't around to pick it up yet!


I'd like to mention a fabulous project that I was linked to at Amber Dawn's blog. They are selling this beautiful necklace, done as a collaborative project, to raise funds for breast cancer. WAY TO GO, LADIES! Not only is the necklace absolutely stunning, I love how the money goes to such a great cause.


Edited afterwards:

Thank you so much to Amber Dawn for her fabulous comment she left! She left a comment on the post two previous to this one, with her tips about working with resin. Her advice here is fabulous, and I just had to add it to the post here so everyone could else noticed it too! It was too good to just sit in the comment section...

Here it is:

"Always mix the resin and hardener 1:1
or 2:2
Always the same of each not more hardener.
As for the cloudiness, your image could be bleeding into the resin.
A way to prevent this is to seal the print outs and art work with package tape. Place package tape on BOTH sides of your paper burnish it.
OR you can seal it with clear sealer stuff.
I personally find that rubbing alcohol works VERY well at getting resin off of my hands and work surfaces.
Just work on wax paper over more paper, like old newspapers and you are good to go!
When mixing your resin, stir slowly. Don't use a paint brush or painted stick.
You can use wooden or plastic swizzel sticks.
I use a flat surface to mix my resin and scrape the resin back and forth to mix it. Credit card offers or old credit cards snipped into smaller sections are PERFECT for doing this!

Doing it fast causes cloudiness or big bubbles.
ALWAYS use good ventilation.
I damaged my organs/kidneys years back because I didn't know that an open window wasn't good enough. I also got a lot on my skin!
Now I use a fan which pulls the air out of the window, and I have another window open to create cross ventilation. ALWAYS ALWAYS WEAR GLOVES!
Dale, I am sorry your project didn't work out.
But the learnig process is FUN!
Best wishes!
Amber Dawn (Think Pink) "


What gems of information! Thanks Amber for all of that. I know for myself, I think it answered the question of why my resin went cloudy. While i did use a clean bamboo skewer for stirring, i stirred it quite quickly, and in a 'stirring' motion, definately not a pushing motion. I think that was my problem. Good to know... i'd have done that the next time too!

Friday, November 21, 2008

Resin problem. Any help out there/

So, it's been four days, and the resin from the present i prepared still hasn't hardened completely (see previous post)! I searched the net for help on this, and found causes for this varying from changes in humidity to cheaper resin to insufficient hardening agent. What i did not find was an answer to how to fix this problem. Should i just add another layer of resin that will (hopefully) harden propperly this time? Is there some kind of 'hardener' or technique i can use to help it harden? Just putting this out there, i know some of you are so skilled at working with resin!

By the way, i just noticed that i am here my 2000th viewer to my blog! Wow! Thanks for all the hits guys. This is really great. I will have to do a giveaway or something someime soon.

As for how things are going with my looming move to Seoul, things are progressing fairly nicely. There have been a number of hitches and holdups along the way, but at this moment things seem to be going well :). Wish me luck for a speedy delivery and procesessing!

Monday, November 17, 2008

Present finished

I've been having a highly enjoyable weekend. Friday night, I went out with a friend i don't get to see very often, and we watched 'Burn After Reading'. Wow... i would highly recomend this movie to pretty much anyone, as long as you can handle movies with rather mysterious endings (this one didn't really have an ending at all, but it was perfect that way). I also saw Zach and Miri Make a Porno... it was unexpectadly endeering and cute.


I finished a nice case for the bracelet i made for my friend Erin. Here are some pics. I just felt like the bracelet was so tiny it made a little fragile puddle... it needed a case to hold it in (you can see the bracelet on it's own in the previous post. The case was created with a matchbox tin. I gessoed and painted it, drilled holes, wired it to a rusty washer on the top and a etched copper butterfly on the bottom. Glued onto it is a bottle cap, with a picture of a butterfly and the stamped word 'fly'. I really like how this piece turned out :). I hope Erin likes it.

I have a dilema... There is a workshop here in regina on wednesday evening about altering photos for artistic purposes, but wednesdays are also jazz band practices... I am so torn! Should i be off playing my trombone at practice, being responsible and such, or should i play hooky and go to the workshop??? hmmmm... i will see how i am feeling on wednesday.

Friday, November 14, 2008

Gesso and new bracelet

I occasionally pop in at the GPP Street Team website... this time i decided i would try out what they were talking about. The theme this time is gesso. I myself was specifically interested in the idea of stamping with gesso... that kinda blew my mind haha. Apparantly, the gesso acts as a resist when you stamp it, so that if you paint overtop of it with another colour after it dried, and then wipe off some of that colour the white (or whatever colour you used) of the gesso will show through. Fascinated by this, i thought i'd give it a shot.

I had previously stamped this card with the mask shape, as I found an irresistibly gorgeous hand carved stamp at an Artist Trading Card meeting (no one seemed to know who carved it...?). I got a couple stamps in while i could :). I then stamped the word 'masque' (french for mask) and used the resist technique... voila!


I have also been working on a bracelet for a friend of mine, Erin. I missed giving her a present on her birthday, so this is going to be a belated birthday present. I figure that late is better than none? This is a rather simple bracelet, made with twisted wire and these gorgeous beads I picked up while in the Rockies. Their frosted green colour reminded me of the ICY COLD glacial rivers where I went white water rafting. I want to finish of a nice case for it to go in. I am thinking something similar to the mint tin i made a while back for my friend Tasha's birthday... but with the bracelet inside instead of a unicorn.

I still don't have a date yet for when i leave for Korea... I am hoping that it will be soon. I kinda get the feeling like I am sitting here waiting for things to get started. That feeling you get when there is something totally exciting looming in the future, but it is uncertain when it will actually happen. Wish me luck that the immigration office processes our papers quickly :).

Tuesday, November 11, 2008

Candy Drops finished


Finished off another piece today... i was so very inspired by Sarah Ahearn's 'Falling fruit'. I created my own piece, 'Candy Drops' that was inspired by this.

I am not pleased with the quality of the photo here. Usually, i take a photo and then if it is giving me problems i adjust the lighting and sharpness in photoshop. However, I have bought a new laptop (woo!) but it does not have Adobe Photoshop. I would love to have it here on my laptop but it is sooooo expensive!! I cannot even upload my pics of my atcs on the ATCSforall website as they are too big. With photoshop, i could re-save it as a smaller file. I'm putting a question out to you guys... what program do you use? I do not need the immensity of power that is in photoshop, just something where i can edit photos brightness/contrast, crop, and most importantly shrink the size of the pictures (as in sort of compress or something). Any suggestions out there????

Monday, November 10, 2008

Finally back!

Things got a little crazy in the past couple months, and i had to let a couple things slip just a bit to get my bearings... blogging was one of those things. However, i am back and now ready to go again! I feel like i have so much to talk about, in relation to art and just my life in general! Many things are happening here. Sorry for the really long post here.... just getting all caught up.

I will be moving to Seoul, Korea to go teach overseas sometime late November to early December. I have been sooo busy lately with preparations to go... packing, preparing paperwork, working out storage etc. However, lately i have still been finding some time for art. I am very pleased about this.


I had signed up for an awesome swap on ATCs for all. I was very pleased with how my cards turned out. I experimented with acrylics on the pear card, with beading on the corn card, and with "stitching" (loosely termed) on the strawberry card. All cards turned out great.


I also have been working on a new atc with a kind of christmasy theme. This is the card so far... but it is not done yet. I started by hand stitching together two pieces of canvas, and then stitching on two fabric pieces and an image of holly. Now, i feel that it needed a kind of stitching or something around the edges, more of a decorative type of stitch. I was originally inspired on this piece by Collette's blog piece here and i couldn't resist the blanket stitch around the edge... but i had never done one before. I found a fabulous tutorial on the web, and decided it was time to learn how... (tutorial here).


After many many MANY mistakes, a couple words coming out of my mouth I'm not quite proud of (oops) and a couple tries, i finally figured it out. Here is an edited version of my practice stitching... by the end i think i pretty much got it!


I also picked up the new issue of cloth paper scissors! How exciting. I really enjoyed this issue. I was especially inspired by the art of Sarah Ahearn, in her 'artist profile'. I really liked her colour palettes she used, especially her use of gorgeous pastel colours. The pic here is a piece i was particularly inspired by. She called it Falling Fruit.


I couldn't resist making my own impression of what she did here. I started with mixing watercolours and iridescent medium (my favorite thing to give things that bit of sparkle) and painted the background with nice pastel colours of blues, greens, yellows, and browns. I then covered it with a thin blotchy coat of white, and next added some drops of colour. It is still a work in progress, but this is what i have so far...


Just wanted to put out a little thank you out there to the bloggers who were so supportive of me while i was gone for a bit... thanks for thinking of me ladies! You are truly wonderful.

Monday, August 04, 2008

Another ATC for New York


I have finished another ATC for the New York swap i talked about earlier. The theme is domestic things and such... it doesn't get much more domestic than strings. I like the multiple meanings and symbols behind the idea of 'mom's apron strings', with both good and bad connotations.

It didn't scan great because of the bump where the knot and ties are, but it is good enough to see what it is :).

This one was fun to make. I used both hand stitching and machine stitching on fabric.

Two down, seven more to go to be ready for the exhibition in New York.

Saturday, August 02, 2008

Life Changes

I know i haven't been posting much lately. I have been sort of thinking about things and doing my best to stay as busy as possible. Last week, i ended my relationship with Ray, after having been together for 9 years. This had been coming for some time and wasn't a shock or anything, but still is a little unsettling and sad. However, i am doing surprisingly okay.

I just got back from a visit with my grandparents. My grandmother gave me some lovely art supplies that i am very excited to give a go. Most exciting is a lovely set of gouache paints. I remember there once being a challenge on Jen Worden's blog that used gouache that looked great but i didn't have any.,... maybe now is the time lol.

I have finished off a couple more atcs that i need to post. I will get to doing that soon :)

Tuesday, July 22, 2008

Back to ATCs

So, I received an e-mail saying that a gallery in Vancouver is holding an ATC exhibition, and they are calling for submissions. Although i will not be able to attend, it still seems pretty neat. I love trading in new ways. I will be sending 9 ATCs to the Richmond art gallery by August 22nd. They are asking for the submissions to be along the themes of things like domestic life and such. You can find more info about it here.

So, i've been creating more atc's lately. There is a swap on saturday in a nearby town that i'll be going to... this should be fun. I have to buckle down and create some cards for trading before saturday. I really like how Secret Glen turned out.

Here's two i've finished. The first is for the exhibition, and the second is for the swap on sunday.


I have finished the second jewelry project from Stephanie Lee's book Semi-Precious Salvage. I'll be posting it tomorrow, or soon. Time to move on to the third :). However, i think my ATC making may take precedence over it for this week.

Sunday, July 20, 2008

Tash's birthday present

Yesterday, I finally finished my other friend's birthday present. My friend tasha, the seamstress discussed in a previous post, is having her birthday get together tonight, although her actual birthday was about a month ago. So, essentially this gift is about a month late... but so is her party so that's ok hahaha.

Tasha really likes unicorns, and i have had a facination for some time with the beautiful tin art shrines that i have been seeing on flickr. I especially like the ones i saw on Teresa's flickr here. I figured it was time for me to try making one myself.

So, i started with this super cute tin that my mom gave me. It had a lid, and i started using the lid, but it just scratched up the paint to put it on later so i tossed the lid. I painted the tin up, and while the effect of the tin showing through was cool on the inside i wanted thicker paint on the outside so i guessoed it (haha new word) and then re-painted the outside a delicious purple.

I went to the dollar store, and bought a cheap unicorn. I cut the head and front hooves off, and glued them inside the tin. My boyfriend is working at a heavy equipment construction company. As i was there for a picnic, i noticed this sparkly, shaved thin metal strips beside the dumpster..... and totally took them lol. (my boyfriend and his co-workers thought i was crazy and that i'd never use it... well who's laughing now? lol). I broke the metal into pieces and glued it around the head and hooves, as the colour was just too perfect. Found a cute pair of earings with skulls (haha) on them, and added them in on the little shelf inside. Voila, a couple final touches with flowers, painted horn and jewels and the inside was done.

I drilled holes in the top and bottom. I threaded wire through the top and bottom, and added a chain with a large soldered charm nameplate for the horse.

I really hope tasha likes her present! The shrine is in the green package :).

Tuesday, July 15, 2008

Judy's fabulous tutorial

I stumbled across a fabulous felting tutorial for an absolutely stunning project on Judy Scott-Kinross' blog. I absolutely adore the project she made and she has a wonderful tutorial laying it all out. Fabulous! Go check it out!

As for myself, i now have all the supplies i need for the next jewelry project, except nickel. Where on earth do you get nickel?????? Could i use copper instead, or are there certain special properties nickel has for etching and jewelry making?

Thursday, July 10, 2008

New Challenge... for myself :)


It's here! It's here! I just got a call a couple days ago from my local bookstore, saying that my copy i'd ordered in of Semi-Precious Salvage, by Stephanie Lee had arrived. As soon as i picked it up and flipped through, i knew it was the next step for me. I already fell in love with Stephanie's sense of style and beautiful art jewelry on her blog... now it was time to start following some of her projects. I immediately flipped to the first project and checked it out... gorgeous as expected. I scanned through the list of things i would need to create this, and saw that all i was missing was 24 gauge wire, a brayer (which i ended up not buying.... just couldn't find one i really liked! I need to find a brayer at some store that i can bond with...haha) and metal files... that is very reasonable for price! Everything else, i already had. I love it when things work out that way... :)


So here are the pictures of the first piece i created from this book. I deviated slightly from the instructions... prefering the hammered copper look over a stamp of white acrylic paint and only able (and prefering?) the gold wire over black. I skimped on the pearls and used these gorgeously smooth green beads i had instead. As well, instead of making this a brooch (in which i'd probably never wear it) i made this into a necklace pendant instead. Other than that i stuck pretty much to the instructions. Jewelry creation is rather new to me, but i am so very pleased on how this turned out.


I am creating a new potential challenge for myself... i want to try working my way through the projects in this book. This is very similar to Jen's challenge of last month, but i am not happy with teh book i picked... it was way too many techniques and lacked specific projects to work on. My other book is still a valuable book to have about photo altering techniques, and i did create two projects (i loved the lilac one, and the keyboard one turned out okay), but it is not quite the 'start from the start and work to the end' type of book. I am giving myself a personal challenge to work on this one.

I am also working on another birthday present. I have a friend who adores unicorns, and i'm making her an art shrine. I had the perfect little matchbox, and found an adorable plastic unicorn at the dollar store. I'll post you some pictures when it's done.

Wednesday, July 09, 2008

Flickr Mosaic Meme


1. Dale Chihuly in Iceland, 2. Tarako spaghetti lunch, 3. Angkor Thom #1, 4. Autumn walk, 5. Juno, 6. El pez en el espejo / The fish in the mirror, 7. Boat, 8. vintage tea set with cupcake, 9. Young At Heart, 10. Always Marry An April Girl, 11. Last day in Paris, 12. A WINTER'S DALE


I decided to participate in a Flickr meme that looked like a lot of fun. I find myself enjoying flickr more and more lately... it really is a great social photo sharing site. Here's the challenge, as i saw over at Leah's blog. The instructions here were copied from her blog.

Anyways, here's the idea behind the meme:

* Type your answer to each of the questions below into Flickr search.
* Using only the first page, choose an image.
* Copy and paste each of the URL’s into the mosaic maker over at FD's image maker.

The questions:
What is your first name?
What is your favorite food?
What high school did you attend?
What is your favorite color?
Who is your celebrity crush?
Favorite drink?
Dream vacation?
Favorite dessert?
What do you want to be when you grow up?
What do you love most in life?
One word to describe you.
Your Flickr name

Tuesday, July 08, 2008

Present for fletcher

You may have notices a glass box i was working on earlier. Well, it was my friend Fletcher's birthday last saturday. I finished the box just in time. Inside the box, i placed an anime keychain of this crazy sword guy. I think he's from a show called Bleach or something? Either way, fletcher seemed very pleased with it.

Recently, i picked up Sommerset Workshop magazine. I am kind of in the middle of nowhere, workshop wise. I have often wistfully looked at a map that shows the distance between here and saskatchewan and portland.... it would be a 19 hour drive. Sigh. No Artfest for me.... yet. Give me time to work a little more and then i'll have the money/airmiles to fly :). For now i appease myself by buying fabulous magazines and such.

In the Sommerset Workshop magazine, they had a section by Hanne Matthiesen. I also checked out her blog, and loved it. In the magazine, she discussed and demonstrated how to create waxed paper. I just loved it! I find beeswax to be a wonderful medium. I had played with it previously on my 8X8 lilac piece, and figured it was time to smell up the basement of beeswax again lol. I used an electric fry pan thing to melt the wax... the same one i use for dying felt. However, i guess that i did not wash it out very well since i last dyed, so the wax all turned purple! It was such a pretty purple though that i didn't mind. I waxed vintage sheet music, brown packing paper, scrapbooking papers, white paper, white satiny fabric and canvas. All came out with a softly purple hue. Wonderful.

So, i used this paper as wrapping for fletcher's birthday present, and a piece of the sheet music for the tag. Here are some pics of how they turned out :).


And last of all, here is fletcher before he opened his present.


Monday, July 07, 2008

My pretty birthday skirt!

A friend of mine, Tasha, is an incredibly talented seamstress. I was so very pleased when she said that she would create me a dress. We scoured flickr and many other online photos for ideas, and finally got an idea of what we were looking for. Here is our first inspiration picture. It is not exactly what we would create, but it was our starting point. Isn't it just fabulous?

We decided create a corset top and a separate layered skirt bottom. As i am quite short (5'2) we decided to make a shorter type of skirt, not the full length pooffy dress as the photo (although hers is sooooo gorgeous). We selected four different black materials and then got started.

After some time working on this, we finished the skirt! We put a final push in at the end, to finish the skirt piece in time for my birthday. I am just so excited to have this done :). We went out to a nice restaurant for my birthday and i loved being able to wear my new skirt. I wish I'd have gotten some pictures on my birthday to show you! Oh well. Here's some pics of me modeling it with a different, more casual shirt.


Now we just need to work on the corset top. Being rather 'top heavy' with a pair of FF's, it will be my first corset as stores don't carry my size. How exciting!

Saturday, June 28, 2008

Glass box and a dilema

I don't think my friend Fletcher reads this blog, but you can never be too careful. It is Fletcher's birthday coming up, and i wanted to try making him something. I've been playing around with the idea of working with soldering and glass. (Collette, I truly appreciated your comment on the previous post. It got me thinking that it was time to try again). I have yet to feel 100% successful on any of my soldering and glass projects. I was happy with the last one until the solder around the jump ring snapped. I need a way to make that stronger. However, i decided it was time to try again, as this is a rather difficult technique that takes practice to perfect.

I was looking again through Sally Jean Alexander's 'Pretty Little Things' (my ultimate source of ideas for glass) and was intrigued by her glass box. I decided to try making one myself.


Fletcher, if you are reading this... please stop here.


So, here is my box i made. I carefully measured 5 squares of glass and one of mirror 1.5 inch square. I notice that Sally says in her book to use 2mm thick glass. Mine is at least 5. However, i will just work with what i have (the 2mm prob would have been better for this though). I cut the copper tape so it wasn't so wide, so that the visible glass would have a larger surface area. I then taped the edges of each piece, and then taped the pieces together in the shape. I left the lid off for now. Last, i soldered it all together.

Now i have a dilemma. What will i put in this box? Any suggestions of what i could put in here for a present for my male friend? Hmmmm...

Saturday, June 21, 2008

Posting second project


Here are some pics of the second project here. I am pleased with how some parts came out, especially the photo manipulation, but not so pleased with other parts such as the stencil and stamping.

So, i used a variety of techniques on this piece, that i crossed off on the previous quote. I really liked the way it turned out with the different inks on the piano keys. Sparkle sparke :)

I'm not so pleased with how it turned out with the stencils. I made stencils myself. I liked the way that it turned out on paper, but it turned out sort of messy on the photo and the gel medium. Sigh.

So, two projects down, i'm not sure how many more to go. We will see i guess :). I still have 10 days to go... that's one third of the month.

Wednesday, June 18, 2008

Status of the challenge

The challenge is going pretty good so far. I am working on the finishing touches on the second piece. I find that this is more difficult to create my own projects using the techniques discusses, rather than following more of a recipe book type formula, where you create the projects they discuss.

So, we're at about half way through the month and i'm no where near done... but i guess you could say i'm close to half way :) The bolded techniques are the ones i've already done in the first two projects. I will post the second project when it is done, as i am still putting on some finishing touches.


1. Oil paint*
2. Finger painting
3. Impasto*
4. Soft Tones
5. Acrylics

6. Pigment Paint*
7. Stamp in oil
8. Watercolour crayons *
9. Oil Pastels

10. Markers
11. Walnut ink * (anyone know where to find this?
12. Gesso
13. Ink
14. Notch Tool *
15. Crackle Paste *
16. Molding Paste *
17. Gel Medium
18. Sanding
19. Crumple
20. Wax
21. Emboss
22. Velum
23. Transparency
24. Stucco *
25. Hand Carved Stamping
26. Milk Stamp
27. Bleach stamp
28. Bubble Wrap
29. Stencil
30. Fabric
31. Handmade Paper
32. Embossed Paper
33. Cardboard
34. Tape
35. Salt or Sand
36. Tissue/Newspaper
37. Rust/Patina *
38. Mosaic
39. Organza
40. Transfer
41. Text
42. Rub on
43. Draw/Sketch

Friday, June 06, 2008

Two finished things

So far, the challenge to complete every technique in 'Mixed Emulsions' goes well. I have decided the best way of doing this is to create a series of pieces using photographs, each one using a variety of the techniques discussed. I have finished my first piece, Lilacs.


In Lilacs, I tried out many of the techniques discussed in the book. I used: soft tones, watercolour paints, wax, decorative paper, text, finger painting and corrugated cardboard. Seven down, thirty six more to go.

I really like how this turned out. I like the ties between the warm beeswax smell and the smell the lilacs would have. I picked up a piece of beeswax at the farmer's market, and dripped it around the altered photo, melting it with my soldering iron. This was my first time working with wax. I am generally happy with how it turned out considering that it was a first effort, but i know that i still have a long way to go before i become proficient with wax.

The second project i finished off today is the collage house created for Hannah, for the give-away as the 1000th viewer of my blog. Thanks again to everyone that has been visiting me here... i love seeing all the comments that you all leave me.

I created this house with cardboard as a base. The cardboard was gessoed and then painted. After scratching up the paint, I nailed the two pieces together with small golden nails. The 12 (Hannah's house number) was rubbed onto the top. I glued a piece of word art 'Keys to the past' to the metal door piece i picked up at a restoration store in town, and glued on a small key. And voila! C'est tout fini! All done, I will mail it to Hannah in Sweden tomorrow.

Tuesday, June 03, 2008

Huge challenge... accepted? I'll try my best :)

So, Jen Worden does a challenge on her blog once a month. This one is a doosy! The challenge is to get a book (one of those project art books) and do EVERY project in the book! I am so excited! You aren't really supposed to buy a new book on this one, but i just couldn't resist the excuse of buying myself another... this is now my third I've bought, though i have borrowed many of them from the library.


The book i chose isn't really a true project book, although it is a how-to art book. It more teaches techniques rather than specific projects, although it sort of has some of those too. I chose Angela Cartwright's book 'Mixed Emulsions'.

So as i already said, this book does not have a list of projects per say, it is more a list of techniques. So,my plan is to make projects, trying out EVERY technique that is listed in the book. I am hoping that this is close enough to the challenge... but the challenge seems pretty loose. It's more about trying things out. I think the spirit of the challenge is to sit down and really try out everything there is do do in one of the books, to use it to it's fullest. Without further ado, this is the list of techniques discussed in the book, and i am going to try to use all these photo altering techniques within the next month! (Wish me luck!)

*I will need to buy some supplies, the stars indicate the ones i need to go shopping for

1. Oil paint*
2. Finger painting
3. Impasto*
4. Soft Tones
5. Acrylics
6. Pigment Paint*
7. Stamp in oil
8. Watercolour crayons *
9. Oil Pastels
10. Markers
11. Walnut ink * (anyone know where to find this?
12. Gesso
13. Ink
14. Notch Tool *
15. Crackle Paste *
16. Molding Paste *
17. Gel Medium
18. Sanding
19. Crumple
20. Wax
21. Emboss
22. Velum
23. Transparency
24. Stucco *
25. Hand Carved Stamping
26. Milk Stamp
27. Bleach stamp
28. Bubble Wrap
29. Stencil
30. Fabric
31. Handmade Paper
32. Embossed Paper
33. Cardboard
34. Tape
35. Salt or Sand
36. Tissue/Newspaper
37. Rust/Patina *
38. Mosaic
39. Organza
40. Transfer
41. Text
42. Rub on
43. Draw/Sketch

While it is true that there are 43 different techniques here, more than one technique can be combined in one project. All of these techniques are smaller parts of a bigger project... some cannot even stand on their own.

Wish me luck! I'll be editing this post as i go, showing my progress by putting x's beside each one :).

Friday, May 30, 2008

Soldered Necklace Charm, music notes


I finished another soldered necklace charm. If you look back to previous posts, you'll see that i made my list of things i've learned about soldering. I like to think i'm somewhat better now than i was then: lets review that list:

1. It is important to burnish down the copper tape or it will just peel back and crispify and such I still have some problems with the tape not being completely smooth and having some small divets and such, but it never peels and crispifies anymore :)

2. The blow torch is too strong. It turns the tape into a burnt, discoloured crisp and makes the glass smoky. My soldering iron is working MUCH better. Far better controlled.

3. It is important to not only wrap the two pieces with copper tape individually, but to also wrap them together with another layer. Otherwise they are too difficult to hold with pliers, they move when you don't want them to and the image inside gets burnt to a crisp. This is working so much better, and i can easily hold it with pliers now. I have also discovered that if you want to add a jump ring, it is MUCH easier to tape it on BEFORE soldering, not after. Previous projects went wrong from insufficiently planning ahead for this, but with this one's planning it went well.

4. 'Soldering irons' that cost 2.50 are not sufficient. A glue gun gets hotter than that piece of crap :p The soldering iron gets maybe a little too hot, but generally pretty good.

I am pleased with how this is progressing.

Tuesday, May 27, 2008

New Sommerset Studios issue and new felted bracelet

I bought the new Sommerset Studios issue in May. However, Cloth Paper Scissors is released at that exact same time, and both are bi-monthly. So i have to wait TWO LONG MONTHS before i can get another magazine of either one! So i try to space them out and make each last as long as possible. I read the Cloth Paper Scissors issue back when i first got it, and I really did try to save the Sommerset Studios issue till June, but it just didn't work... last night i was sitting around and simply HAD to start it. I'm still trying to stretch it out and make it last as long as possible, since the new one isn't out till July :(

I was so pleased to see that one of my favorite bloggers, Stephanie Lee, at Semiprecious Salvage had an article in there. She made a fabulous mixed media birdcage that was just wonderful :). I loved the fun, rustic feel to it. If you haven't checked out her website yet, you totally should :).

As well, i recently finally finished off a felted bracelet (actually, because of it's width it's called a 'cuff'). I really liked the way it turned out with the deep green dye. I used the fancy Jaquard dyes and it worked really well. Boiled it in vinegar and dye for half an hour and voila!