First i'd like to put out a thanks to the lovely Carmi. She really came through for me last post, when I asked about what to do when your resin does not cure propperly.
I thought I'd throw out there what I have learned myself so far about working with resin, as I didn't really find a sastisfactory answer on the internet before Carmi came along.
1)The humidity of the air affects the curing of the resin. I had done work with resin before, but it dried outside on a hot, dry summer day. This time, it cured in my basement. I found large differences with results between the two (the dry air being the better result).
2)In order to remove the bubbles forming in the resin, use a bbq lighter and wave the flame back and forth over the surface. The heat causes the bubbles to go away.
3)The amount of hardening agent in relation to the amount of resin is very important. If there is not enough hardening agent, the resin will not cure propperly.
4)Be very careful when working with resin. It is extreemely difficult (impossible?) to clean off if your resin drips on your a) table, b) hands, c) jeans, d) mistaken parts of your project. (Unfortunately, resin dripped on all four for me. Luckily, the jeans were old and already ruined when dripped India Ink).
5)Resin makes a really neat coating on top of paper. I used the leftover resin from remaking my charm and coated two backgrounds for ATCs that i'd made... it dried really neat and shiny, as if the piece was made from plastic. Well worth trying :).
6)Sometimes, after you mix resin, it goes CLOUDY! I don't know why this happened. Any commenters out there that can answer this, i will edit the answer in here.
7)Don't glue resin charms onto the main piece until you are CERTAIN that they have cured properly.
8)If there are small scratches on the surface of your resin, you can sand it or add another coat of resin to smooth it out. ( I haven't tried this one myself yet, but this is what i read on a blog)
So, as you can see, I definately learned some positive things and some negative things about working with resin. I decided to follow Carmi's advice with the previous embelishment i had been working on, and just add another layer of resin that would hopefully cure propperly. It was clear when i mixed it, but when i looked at it again about 5 minutes later, it had gone quite cloudy! I tried washing it out, hoping it would get out the resin (where i learned lesson #4 lol). This did not work at all. I had to pull off the charm, which wrecked the paint. I therefor had to re-prime, re-paint and make a new charm for the piece. I have created a new charm now that I think I like even better, and all that remains is for me to screw it onto the main piece. I'll post this once it's finished. Good think Erin isn't around to pick it up yet!
I'd like to mention a fabulous project that I was linked to at Amber Dawn's blog. They are selling this beautiful necklace, done as a collaborative project, to raise funds for breast cancer. WAY TO GO, LADIES! Not only is the necklace absolutely stunning, I love how the money goes to such a great cause.
Edited afterwards:
Thank you so much to Amber Dawn for her fabulous comment she left! She left a comment on the post two previous to this one, with her tips about working with resin. Her advice here is fabulous, and I just had to add it to the post here so everyone could else noticed it too! It was too good to just sit in the comment section...
Here it is:
"Always mix the resin and hardener 1:1
or 2:2
Always the same of each not more hardener.
As for the cloudiness, your image could be bleeding into the resin.
A way to prevent this is to seal the print outs and art work with package tape. Place package tape on BOTH sides of your paper burnish it.
OR you can seal it with clear sealer stuff.
I personally find that rubbing alcohol works VERY well at getting resin off of my hands and work surfaces.
Just work on wax paper over more paper, like old newspapers and you are good to go!
When mixing your resin, stir slowly. Don't use a paint brush or painted stick.
You can use wooden or plastic swizzel sticks.
I use a flat surface to mix my resin and scrape the resin back and forth to mix it. Credit card offers or old credit cards snipped into smaller sections are PERFECT for doing this!
Doing it fast causes cloudiness or big bubbles.
ALWAYS use good ventilation.
I damaged my organs/kidneys years back because I didn't know that an open window wasn't good enough. I also got a lot on my skin!
Now I use a fan which pulls the air out of the window, and I have another window open to create cross ventilation. ALWAYS ALWAYS WEAR GLOVES!
Dale, I am sorry your project didn't work out.
But the learnig process is FUN!
Best wishes!
Amber Dawn (Think Pink) "
What gems of information! Thanks Amber for all of that. I know for myself, I think it answered the question of why my resin went cloudy. While i did use a clean bamboo skewer for stirring, i stirred it quite quickly, and in a 'stirring' motion, definately not a pushing motion. I think that was my problem. Good to know... i'd have done that the next time too!
Monday, November 24, 2008
Friday, November 21, 2008
Resin problem. Any help out there/
So, it's been four days, and the resin from the present i prepared still hasn't hardened completely (see previous post)! I searched the net for help on this, and found causes for this varying from changes in humidity to cheaper resin to insufficient hardening agent. What i did not find was an answer to how to fix this problem. Should i just add another layer of resin that will (hopefully) harden propperly this time? Is there some kind of 'hardener' or technique i can use to help it harden? Just putting this out there, i know some of you are so skilled at working with resin!
By the way, i just noticed that i am here my 2000th viewer to my blog! Wow! Thanks for all the hits guys. This is really great. I will have to do a giveaway or something someime soon.
As for how things are going with my looming move to Seoul, things are progressing fairly nicely. There have been a number of hitches and holdups along the way, but at this moment things seem to be going well :). Wish me luck for a speedy delivery and procesessing!
Monday, November 17, 2008
Present finished
I've been having a highly enjoyable weekend. Friday night, I went out with a friend i don't get to see very often, and we watched 'Burn After Reading'. Wow... i would highly recomend this movie to pretty much anyone, as long as you can handle movies with rather mysterious endings (this one didn't really have an ending at all, but it was perfect that way). I also saw Zach and Miri Make a Porno... it was unexpectadly endeering and cute.
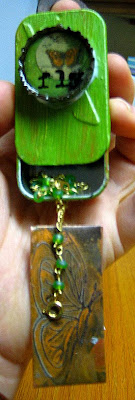
I finished a nice case for the bracelet i made for my friend Erin. Here are some pics. I just felt like the bracelet was so tiny it made a little fragile puddle... it needed a case to hold it in (you can see the bracelet on it's own in the previous post. The case was created with a matchbox tin. I gessoed and painted it, drilled holes, wired it to a rusty washer on the top and a etched copper butterfly on the bottom. Glued onto it is a bottle cap, with a picture of a butterfly and the stamped word 'fly'. I really like how this piece turned out :). I hope Erin likes it.
I have a dilema... There is a workshop here in regina on wednesday evening about altering photos for artistic purposes, but wednesdays are also jazz band practices... I am so torn! Should i be off playing my trombone at practice, being responsible and such, or should i play hooky and go to the workshop??? hmmmm... i will see how i am feeling on wednesday.
Friday, November 14, 2008
Gesso and new bracelet
I occasionally pop in at the GPP Street Team website... this time i decided i would try out what they were talking about. The theme this time is gesso. I myself was specifically interested in the idea of stamping with gesso... that kinda blew my mind haha. Apparantly, the gesso acts as a resist when you stamp it, so that if you paint overtop of it with another colour after it dried, and then wipe off some of that colour the white (or whatever colour you used) of the gesso will show through. Fascinated by this, i thought i'd give it a shot.
I had previously stamped this card with the mask shape, as I found an irresistibly gorgeous hand carved stamp at an Artist Trading Card meeting (no one seemed to know who carved it...?). I got a couple stamps in while i could :). I then stamped the word 'masque' (french for mask) and used the resist technique... voila!
I have also been working on a bracelet for a friend of mine, Erin. I missed giving her a present on her birthday, so this is going to be a belated birthday present. I figure that late is better than none? This is a rather simple bracelet, made with twisted wire and these gorgeous beads I picked up while in the Rockies. Their frosted green colour reminded me of the ICY COLD glacial rivers where I went white water rafting. I want to finish of a nice case for it to go in. I am thinking something similar to the mint tin i made a while back for my friend Tasha's birthday... but with the bracelet inside instead of a unicorn.
I still don't have a date yet for when i leave for Korea... I am hoping that it will be soon. I kinda get the feeling like I am sitting here waiting for things to get started. That feeling you get when there is something totally exciting looming in the future, but it is uncertain when it will actually happen. Wish me luck that the immigration office processes our papers quickly :).
Tuesday, November 11, 2008
Candy Drops finished
Finished off another piece today... i was so very inspired by Sarah Ahearn's 'Falling fruit'. I created my own piece, 'Candy Drops' that was inspired by this.
I am not pleased with the quality of the photo here. Usually, i take a photo and then if it is giving me problems i adjust the lighting and sharpness in photoshop. However, I have bought a new laptop (woo!) but it does not have Adobe Photoshop. I would love to have it here on my laptop but it is sooooo expensive!! I cannot even upload my pics of my atcs on the ATCSforall website as they are too big. With photoshop, i could re-save it as a smaller file. I'm putting a question out to you guys... what program do you use? I do not need the immensity of power that is in photoshop, just something where i can edit photos brightness/contrast, crop, and most importantly shrink the size of the pictures (as in sort of compress or something). Any suggestions out there????
Monday, November 10, 2008
Finally back!
Things got a little crazy in the past couple months, and i had to let a couple things slip just a bit to get my bearings... blogging was one of those things. However, i am back and now ready to go again! I feel like i have so much to talk about, in relation to art and just my life in general! Many things are happening here. Sorry for the really long post here.... just getting all caught up.
I will be moving to Seoul, Korea to go teach overseas sometime late November to early December. I have been sooo busy lately with preparations to go... packing, preparing paperwork, working out storage etc. However, lately i have still been finding some time for art. I am very pleased about this.
I had signed up for an awesome swap on ATCs for all. I was very pleased with how my cards turned out. I experimented with acrylics on the pear card, with beading on the corn card, and with "stitching" (loosely termed) on the strawberry card. All cards turned out great.
I also have been working on a new atc with a kind of christmasy theme. This is the card so far... but it is not done yet. I started by hand stitching together two pieces of canvas, and then stitching on two fabric pieces and an image of holly. Now, i feel that it needed a kind of stitching or something around the edges, more of a decorative type of stitch. I was originally inspired on this piece by Collette's blog piece here and i couldn't resist the blanket stitch around the edge... but i had never done one before. I found a fabulous tutorial on the web, and decided it was time to learn how... (tutorial here).
After many many MANY mistakes, a couple words coming out of my mouth I'm not quite proud of (oops) and a couple tries, i finally figured it out. Here is an edited version of my practice stitching... by the end i think i pretty much got it!
I also picked up the new issue of cloth paper scissors! How exciting. I really enjoyed this issue. I was especially inspired by the art of Sarah Ahearn, in her 'artist profile'. I really liked her colour palettes she used, especially her use of gorgeous pastel colours. The pic here is a piece i was particularly inspired by. She called it Falling Fruit.
I couldn't resist making my own impression of what she did here. I started with mixing watercolours and iridescent medium (my favorite thing to give things that bit of sparkle) and painted the background with nice pastel colours of blues, greens, yellows, and browns. I then covered it with a thin blotchy coat of white, and next added some drops of colour. It is still a work in progress, but this is what i have so far...
Just wanted to put out a little thank you out there to the bloggers who were so supportive of me while i was gone for a bit... thanks for thinking of me ladies! You are truly wonderful.
Subscribe to:
Posts (Atom)