
OMG... a non art-related post! *gasp*
I've been haunted by a musical artist. Catherine Feeny's voice has been haunting my thoughts, and i feel a pull every time i hear her song 'Mr. Blue.' This is my shout out to all of you that you should totally check out her myspace page here. Her songs 'Mr. Blue' (from the soundtrack to the amazing movie 'Running with Scissors') and 'The Shape You're In' are fabulous :). Here is the link to her youtube video.
Thursday, March 27, 2008

Wednesday, March 26, 2008
A soft, fuzzy purchase :)
So, on a whim, i went to a store here called Golden Willow Natural Fiber. I saw from their window display they had bright bright colours of dyed fuzzy fibery soft stuff... how could i resist? I swear, i love picking up supplies as much (maybe more?) than i love using them! I am building up quite the collection!
So, i wandered in. What do i see but fiber arts magazine, with back issues? I have seen others discussing this magazine, or tooting being published within, and i simply had to pick up a copy :).
After wandering around some, i saw that the majority of what they had was yarn. Now, yarn is all very nice and whatnot, and theirs did look to be of VERY high quality, but it just didn't call to me (i have tried knitting... it wasn't pretty). However, the bins, bags and jars of the soft fluffy unspun wool immediately shouted my name. After going for a fabulous tactile experience of burying my hand in many different bins of unspun wool, i knew i had to have some. The lady there showed me around, and talked to me about dyes and such. In the end, i walked out with a bunch of unspun wool, emerald green dye and a fabric arts magazine. I thought i was also walking out with a felting needle, but apparently i was mistaken and that was left at the store. I think i will try out dying the wool, and maybe do a bit of research into felting before i go back to buy the needle, since i can see me needing other things from there in the future anyways.
So, to end off this post, here are pictures of me 'voguing' with my new wool, and other purchases from the store. Thanks to Ray for taking the shots :) I do believe this is the first pic i have posted here (since making it an art blog) that is of more than just my hands, so this may help you to put a face to the blog lol.


So, i wandered in. What do i see but fiber arts magazine, with back issues? I have seen others discussing this magazine, or tooting being published within, and i simply had to pick up a copy :).
After wandering around some, i saw that the majority of what they had was yarn. Now, yarn is all very nice and whatnot, and theirs did look to be of VERY high quality, but it just didn't call to me (i have tried knitting... it wasn't pretty). However, the bins, bags and jars of the soft fluffy unspun wool immediately shouted my name. After going for a fabulous tactile experience of burying my hand in many different bins of unspun wool, i knew i had to have some. The lady there showed me around, and talked to me about dyes and such. In the end, i walked out with a bunch of unspun wool, emerald green dye and a fabric arts magazine. I thought i was also walking out with a felting needle, but apparently i was mistaken and that was left at the store. I think i will try out dying the wool, and maybe do a bit of research into felting before i go back to buy the needle, since i can see me needing other things from there in the future anyways.
So, to end off this post, here are pictures of me 'voguing' with my new wool, and other purchases from the store. Thanks to Ray for taking the shots :) I do believe this is the first pic i have posted here (since making it an art blog) that is of more than just my hands, so this may help you to put a face to the blog lol.


Tuesday, March 25, 2008
Another ATC finished


So, a quick break from soldering... back to photo editing. In return for a totally gorgeous ATC of hers, a fellow atc'er asked me to make her an atc using photo manipulation, similar to my 'scratched door' atc i'd made previously.
So i went for a walk, taking some pics. My favorite ones were of the trees, stark and bare from the winter, reaching towards the sky. I took a bunch of pics of this, and choose my favorite.
I used photoshop to brighten the colours, edit out the other tree's branches that invaded the shot, and then played with the filters. The ending result was a very stark tree, against a blue white background with black ground. I loved it :)
After printing it off (assuring the print shop that no, they didn't mess up the colours and yes, i only wanted it to fill 2.5 by 3.5 of the photo and leave the rest blank) I played with bleach. Bleach does really neat things with photos. All the red and yellow ground here, and the red and yellow on the tree, were done with bleach. After bleaching, i sanded the sky, painted it fiery colours and sanded again. Voila! My ATC is done :). I wonder which of these three she will choose, and like best? One of them will be going to a good home with her, one of them i am keeping and the third is going to the Mackenzie Art Gallery for my submission of 6 ATC's for ATC day next month :) How exciting!
One committed swap down... only two more to go! Just got to (finally) finish off the altered domino. Waiting on the print shop on that one :) I'll show pics of it when i am finished. Also just signed up for an altered matchbox swap using swapbot. Need to make a spring themed matchbox.... How fun :) Now i just got to somehow find a 32 count matchbox. Ray said he'd pick me one up today.
Sunday, March 23, 2008
First Soldering Charm Success :)


Yay! I finally have a charm that turned out like it should. I have experienced soldering success :)
I learned a number of lessons from my last experience soldering:
1. It is important to burnish down the copper tape or it will just peel back and crispify and such
2. The blow torch is too strong. It turns the tape into a burnt, discoloured crisp and makes the glass smoky.
3. It is important to not only wrap the two pieces with copper tape individually, but to also wrap them together with another layer. Otherwise they are too difficult to hold with pliers, they move when you don't want them to and the image inside gets burnt to a crisp.
4. 'Soldering irons' that cost 2.50 are not sufficient. A glue gun gets hotter than that piece of crap :p
So, I kept all these lessons in mind. I went out and bought a soldering iron that works today. I burnished down the copper tape, used the new soldering iron, wrapped the two pieces together and checked it out.
As you can see by the pictures along the side, this turned out FAR better than the burnt mess i tossed out from my previous experience. I really like the picture i have inside here. I clipped the pic from a book at an ATC meeting. The bg is a piece of map that i also grabbed from the meeting. They have the most wonderful stuff to look through at the meetings! I feel so blessed to have a great group like this here in my hometown. I am also fairly pleased with the texture to the solder. It is not perfectly smooth, but it is fairly smooth, and definitely a pleasure to touch :)
So, I have remedied the problems from the previous time, but still have some more lessons i learned through this time:
1. I suck at cutting glass straight. The pieces were not even. This did not RUIN the piece, but it would have been better with even sides. I think i need a better glass cutting tool (better than my 7$ one...) but don't want to spend a bunch of money on it.
2. When wrapping the individual pieces with copper tape, make sure you know which side is the inside, and which is the outside. Make sure the inside is not longer than the outside, unless you want a bunch of copper tape showing inside. Best to make the inside far thinner than the outside. A little is ok, but i think this one had too much copper tape showing.
3. Do not leave soldering iron in one place for too long. The glass will crack. (see photo with red circle marking crack. I was so sad when this happened. I glued the hook on top of part of it, but the rest of it is still visible. I don't think it highly affects the integrity of the piece, as it seems to be holding together fine. However, i don't like the look of the crack along the back there.
4. Gel medium does not glue copper to glass. Crazy glue works far better. Luckily, no damaging results or lowered quality from this one, just had to redo the gluing.
So, all in all, i would call this a success! The end result shows my newb status, but still is something i can be proud of. I will only get better from here (I hope...).
Wednesday, March 19, 2008
First large work finished!!!

This is an accomplishment for me... i have just recently finished my first art piece that was larger than an ATC! Just a couple days ago, i finished a mixed media piece that was 8 by 8 inches :).
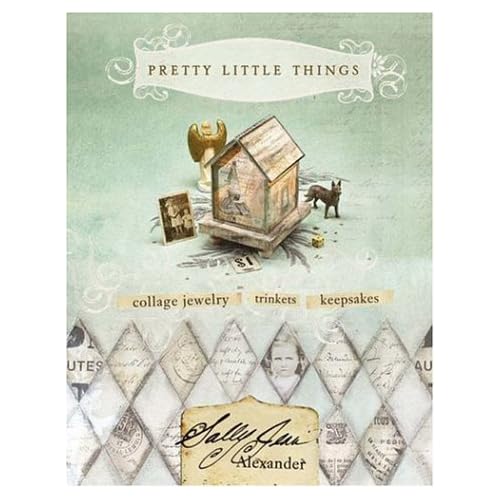 I just recently got hold of Sally Jean Alexander's book "Pretty Little Things". I am really enjoying her work. I am slowly working my way through, savoring each page as i go. So far, i have especially enjoyed her discussion of a collage creation technique. In this, she said to have 10 different techniques ready at hand. You then choose techniques at random from these 10, and do them in the order chosen.
So, for this, my 10 techniques i chose were slightly different than the ones she suggested. Mine were: acrylic, ink, oil pastel, sandpaper, collaged text, collaged image (photo, clipped etc), collaged paper, charcoal, watercolour and glaze. I cut a piece of watercolour paper to an 8 by 8 size. I then wrote all 10 techniques on a journaling page. I chose the techniques using the 'close your eyes and point' method.
Here is the order i ended up with:
1. Stamp (added faces and umbrella stamps)
2. Ink (splattered blue ink all over bg, didn't like how it turned out)
3. Acrylic (added a variety of colour spots in the background, added brown around face and three umbrella stamps. Didn't like colour spots)
4. Acrylic (painted over colour spots with a dark teal colour, much better in my mind)
5. Ink (used india ink to make lines and outlines on the page)
6. Glaze (added glaze of blue over green in bg
7. Oil pastel (added brown colour splotch)
8. Oil pastel (added word 'rain?' on brown splotch)
9. Text (ripped and glued paper frame around umbrella stamp)
10. Watercolour (added blue colour in white spots on canvas where stamps are.
So, there you have it. My first (somewhat) larger piece. I'm not saying it's huge or anything, it's only 8". But for me, that's a big step in the right direction :).
I'm not sure i would use this technique as a regular means of creating art, what with the media usage being so random. I don't like the way that you can't really plan as effectively where you are going with the piece, in some ways it somewhat distances you. However, as an exercise for playing with how different media go together, i find it perfect. The options for different media are endless. You could do this with a larger photo bg, and use things like 'bleach' or 'sand' and such instead of other methods. Although i do feel it distances you from your art and lessens the possibilities for both planning and creativity, it is also an enjoyable way of creating art where there is less pressure of the 'blank canvas' and less wondering what to do.
Wouldn't it be fun to try something like this, where a bunch of people make a collaborative list of different techniques/media and create art in this way for a swap or even simply a challenge? I'd love to try something like this. Maybe i will host something like this here on my blog? I wonder what kind of response i'd get? :) I think i'll just throw the idea out there now, and if you would be interested in something like this drop me a quick comment or something. :) If you are interested, would you want to do this as a challenge, with a prize for the a random participator, with maybe something small for each person who participates? Or would you prefer to have this as a swap, where we trade art? Let me know what you are thinking.
Come on, don't be shy :) :) :) I don't bite.... hard....
Saturday, March 15, 2008
'Get your butt in gear and finish the darn work' challenge

While this is not the official title for the challenge, this is how i view Jen Worden's challenge for this week. And even with the poke in the butt by the challenge, i was still a day late hahaha. Oh well. Luckily for me, her challenge was running late too so i was able to submit my piece for the challenge.
I have just recently stumbled upon DJ Pettit's blog. I find her work to be fabulously inspiring. She is absolutely fantastic at incorporating sewing into her art. I was in awe especially of her one painting of a woman posted on March 5th. If you're having trouble finding the post or something (though it is quite easy to find), here is a link to the pic.
I started this piece some time ago... i would say that i started it about 4 or 5 months ago, if not more. Then life happened. However, with my fresh reminder and inspiration by DJ, i decided to finish this one for the challenge.
This piece was created with watercolours on watercolour paper, and then stitched with my sewing machine. I believe the original inspiration came from a cloth paper scissors magazine?
Thursday, March 13, 2008
Soldering Screw-ups
So, another gorgeous day today. Decided to try my hand at soldering my newly created charms from last night. All the glass was carefully and neatly cut (spraying little glass chips all over...oops sorry ray). The images for inside were carefully selected and cropped out. The glass pieces were individually wrapped in copper tape... i was ready to go.
Here is an example of how it looked pre-soldering, in all it's cuteness:


So i took everything outside and got set up. Got the blowtorch going with no problems, was a simple matter of using the bbq lighter instead of matches. So i tried holding the two halves together with needle nose pliers. Which is where i met with my first problem. I couldn't hold them in the middle of the charm because of the pliers angles. And if i held to the left or right, it would hold that side lower down than the other and they weren't even. After wrestling for a while with the charm halves and the pliers, we met with a very precarious equilibrium.
So, it took some time but the copper tape heated up nicely enough for the solder to melt... ooops forgot the flux! Had to turn off the torch and paint the flux on, which sizzled satisfyingly. Then got going. But the problem now is that the inside of the glass, especially where the paper butterfly was glued on with glue stick, turned black, smoked a lot and crumbled. Guess even with it held together it didn't work out. And then in the end the glass went kind of black, the copper tape crisped up and the stained glass cracked. Ok... this didn't go so well. Here are the results. It was terrible.


I think i will give myself a day to relax, and then try again tomorrow. but next time, i will tape the two pieces TOGETHER so the flame/smoke/heat can't get inside as easily and so that i won't have the pliers problem. If you look at the pics above, you will see i have also copper taped them together now. But now I'm not sure why the solder is necessary, since the tape is adequately holding them together. However, i love the look of solder...
I see that Sally Jean Alexander's book 'Pretty Little Things' that i have been drooling over at Chapters is in the library. That works well for my limited budget. I'll tie myself over with the library copy, and then ask for it for my birthday :). That's a good plan... or just to love it so much that i go out and buy it anyways. hahaha. We'll see how much i NEED it after borrowing it.
Here is an example of how it looked pre-soldering, in all it's cuteness:


So i took everything outside and got set up. Got the blowtorch going with no problems, was a simple matter of using the bbq lighter instead of matches. So i tried holding the two halves together with needle nose pliers. Which is where i met with my first problem. I couldn't hold them in the middle of the charm because of the pliers angles. And if i held to the left or right, it would hold that side lower down than the other and they weren't even. After wrestling for a while with the charm halves and the pliers, we met with a very precarious equilibrium.
So, it took some time but the copper tape heated up nicely enough for the solder to melt... ooops forgot the flux! Had to turn off the torch and paint the flux on, which sizzled satisfyingly. Then got going. But the problem now is that the inside of the glass, especially where the paper butterfly was glued on with glue stick, turned black, smoked a lot and crumbled. Guess even with it held together it didn't work out. And then in the end the glass went kind of black, the copper tape crisped up and the stained glass cracked. Ok... this didn't go so well. Here are the results. It was terrible.


I think i will give myself a day to relax, and then try again tomorrow. but next time, i will tape the two pieces TOGETHER so the flame/smoke/heat can't get inside as easily and so that i won't have the pliers problem. If you look at the pics above, you will see i have also copper taped them together now. But now I'm not sure why the solder is necessary, since the tape is adequately holding them together. However, i love the look of solder...
I see that Sally Jean Alexander's book 'Pretty Little Things' that i have been drooling over at Chapters is in the library. That works well for my limited budget. I'll tie myself over with the library copy, and then ask for it for my birthday :). That's a good plan... or just to love it so much that i go out and buy it anyways. hahaha. We'll see how much i NEED it after borrowing it.
Subscribe to:
Posts (Atom)


